Thursday, February 26, 2009

Butchering.. WARNING GRAPHIC PICS !!!

Today I butchered Fatboy
and I will share with you my methods.
First and most important is to take
a quiet moment to honor the sacrifice.
One life is to be given for the sustanance
of another and so the food chain goes.
Be pleased in the fact that you have provided
a good and rich life filled with the best feed
and greens and bugs, warm shelter and respect.


I enjoy butchering.
I know it sounds weird, but I find it a meditative
way to spend time.
It is quiet and peaceful.
I do it alone.
I have good music or a good book
in my headphones and my hands are busy.
I am following in the footsteps of
women that have provided food for their
family tables for thousands of years.
Good, fresh and healthful food.
And I am whole.


All that being said....

I use the 'broomstick' method to kill my birds.
I have tried all of the different ways in which to dispatch
a chicken and settled on the broomstick..or rather the stick.

Tie the birds feet.
Grasp it by the legs and lower the head to the ground.
Place the stick across the neck..
and do this quickly. Be kind.
Step on the stick to each side of the neck
and place all of your weight against the stick..
really press downward.
Pull upward on the legs.
Not too quick, but rather steady.
You do not want the head to slip out from under the stick.
That would be cruel and cause suffering.
Once you are sure of the force that the stick can bear
without slippage, give a good YANK.
You should feel the give of the neck separating.
The deed is done. It is all over.

The bird will begin to flap violently.
Fear not.
The bird is no longer functional, it is just the body's
reaction and is purely muscle and nerves.
Hang on tight for the movement can be strong in a large bird.
I try to hang the bird just as this begins to take
advantage of the movements to assist with bleeding out.


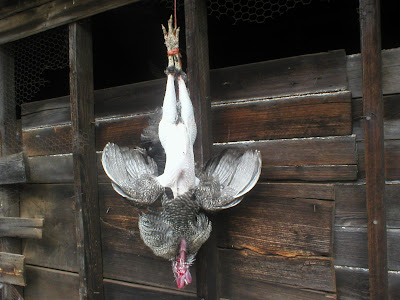
Once the bird is hung take a sharp knife and slit the neck.
Grasp the bird's head and tilt it to expose the neck
and slice across the sides.
There is no need to go terribly deep,
just through the skin and vessels.
As you can see, I have left the throat itself intact.


Now, here is where I veer off the page.
Against all textbooks and hand-me-down knowledge and
contrary to everything everyone else in the world does during butchering..
I dry pluck!

I hate to scald. God! It stinks and the smell stays on your skin
and in your hair and you can never be sure of the temperature
or the time and you mess up the skin and it tears and it STINKS!

So, I dry pluck. The method of killing I think helps
with the ease of the release of the feathers. I have tried to
dry pluck after the old axe treatment and found it difficult.


I take a few feathers in my fingers and pull downwards.
Then I tuck the feathers into my hand and pull some
more and repeat until my hand is full.
It is not unlike the hand movement for picking beans.
Do not try to pluck huge handfuls all at once.
This will tear the skin.
You will find that on the small belly feathers
that release easily you can take more,
but on the back feathers and on the feathers
with larger, thicker quills you can only take a few at a time.
This may seem like it would take forever,
but it really goes quickly.
Especially if you use two hands to go at it.

I have a large trashbag
lining a 5 gallon bucket to catch the blood and feathers,
]but without fail, no matter how calm a day,
as soon as I go to pluck the wind picks up.
So I trade up for a large black trashcan to catch the feathers and
hold them deep and out of the breeze.
I still have feathers all over the place,
but it is better than just letting them fly everywhere.

And, Yes! He is as big as he looks.


I do not pluck the wings or the tail feathers or the neck.
I know I will just be chopping these parts off anyway.
I also do not bother with the 'socks'
as I will be removing the lower legs.
Once the bird is more or less clean I take it down
and move to the gutting table where I chop off
the wings, neck, tail and lower legs and feet.
It may not be a pretty butchering job,
but we don't really eat the wings.
I do know how to make the clean joint breaks like you see in the
store bought birds, but I don't bother for just us.
If I sell a bird, I do it correctly.


You may notice the fiercesome looking weapon lying next to the bird.

This is my tobacco knife. Built like a hatchet or a tomahawk, but with
a very, very thin blade that can be sharpened to surgical sharpness.
A nastier, more lethal weapon I have never seen. Light and easy to wield,
it makes butchering a very easy task.
One quick blow to go through the leg bones and the neck,
but delicate enough to be accurate to remove the tail
while I hold it in the other hand.
If I ever missed......


Now comes the part that gives everyone the most trouble.. gutting.
It has taken quite a few years for me to become proficient at it, so
fear not if you are not good.
Lie the bird on its back with the legs towards you.
Pinch the skin of the belly between your fingers and lift up.
Take your sharp kitchen knife and begin to saw back and forth
towards your fingers and lifting the skin more and more as it cuts away.
This gives you and opening into the skin.
Take both hands and stick the fingers into the hole in the skin
and pull the skin apart to enlarge the opening.
I cut away the excess skin and toss it into the bucket/bag.
You should have a membrane staring at you now.
Pinch the membrane up a bit and make a slice in it.
Stick in your fingers and pull it open.


Grab your knife again and lift some of the skin along the bottom of the opening
and begin pulling and cutting towards the vent.
Do this on both sides.
Carefully grab the skin near the vent...
I leave the vent feathers in place so that I can grasp
them ... and slice alongside the vent on each side
so that your birds looks like what you see above.

Now there is only one thing left to do... Stick your hand into the bird.
I place my hand in working along the outside edges first,
loosening the inner membrane as I go.
I do first one side and then the other and as far
towards the neck as I can reach. I work my fingers
and tear the membrane from the ribs.
Once I am in all the way I start working the innards towards
the opening, twisting my wrist as I do this.
Then just get a good grip and pull steadily.
You do not want to tear anything apart.

I am not going to kid you... this is just plain gross. It is warm and sticky.
The pieces parts squish out between your finger.
So, if this is your first time... just go with it. Beer helps alot.
Once all of the obvious parts are out you may cut the rest of the vent away.
This gives you intestines and your vent in one piece
and you don't have to worry about soiling
your bird with poop... which I have done.
Yep. I said it. I got poop on my bird.
And more than once until I got the vent thing down.
But be at peace with the knowledge that your bird ate well
and the poop is nothing but digested grass and veggies
and bugs and fairly 'clean'.
It also washes off.


Now, tilt the opening towards the light and look inside.

See those BRIGHT pink sponges laying against the ribs of the back?

They are the lungs and you have to go get those.
And they do not want to come out.
They are adhered to the ribs and the only way
to do it is with your fingernails.
So, stick your hand back in and begin to run your nails
under the edges of the lungs and lift away.
Then scoot a bit further and scrape and lift again.
Repeat on the other side of the spine.
You may not get all of them at first, but the rest can be gotten
out when you are rinsing out the bird and
you can see more clearly what you have left behind.

Your bird is almost done.
The only thing left is to deal with the esophagus and the trachea.
Rotate the bird until you have the neck facing you.
Take your kife and just start cutting all of that skin and membrane away.
You will see the two tubes. Pull them away from the membranes
and wrap them around your
fingers and pull. They will slip right out of your fingers.
I usually have to take my bandana or rag
and grip with that and pull.
If your crop did not come out with the guts,
this is the time to pull it out of the top.
This is where you will understand why all of the books
and websites told you to withold feed.
It is a much nicer task if the crop is completely empty than trying to pull it
out full of corn and grass and feed.
On occasion I have had to unexpectdly butcher a bird that had a full crop.
I have yet been able to do it without spilling the contents all over the place.


(Under what circumstances does a person have to 'unexpectedly' butcher a bird?
If I can catch a hawk in the act of taking one of my birds
I take the bird back and eat it myself.
I will not eat after a mammal, but I will eat after a raptor.
They make a nice clean kill.)


Your bird should be clean now and ready for a good rinse and scrub in the sink.
I run my hand in the cavity to make sure I have removed all pieces parts.
Then I place the bird in a cooler filled with salt water to soak for three days.
The salt in the water helps to draw the remaining blood
out of the tissues and the three days is to let rigor come
and go so that the bird will be tender upon cooking.
I have 2 qt juice bottles filled with water in my freezer.
I place these in with the bird to keep the water icy cold without diluting
the salt and replacing whenever they start to thaw.


And there Fatboy will stay until I cook him up.
I will be sure to post pics of him in all his yummy goodness.
There really is nothing quite like a fresh bird.


If you have questions or if I was unclear in anyway,
please speak up and I will answer and/or amend.
I hope that this has been interesting and that someone
took something away from it that they can use.

Butchering is not necessarily a part of homesteading,
but everyone should at least know how it is done on paper.
You just never know when you may have to use that info.

For me it is the culmination of why I put forth the time and money into my birds
and I view it as I do my garden and the harvest I glean from those efforts.
I take pride and feel peace from my time in the barn or in the fields.
I feel in touch with those who have come before me.
How many women over how many ages have swung a hoe
or slid their hand into the body of a chicken.
I think of them as I knead bread, my hands sticky
and floury and as I bend to taste my stew, bringing the
spoon to my lips to test for need of more herbs or pepper.
It is the completion of the cycle... from the hatching to the roasting
or from the planting to the harvest.
A bit of me and a bit of history in every bite.


A quick addendum:
I said that I butcher alone, but you will notice
Sweet Husband in the top shot.
See, I did not deal with Fatboy any longer.
He was in a large hutch at face level and he has
gone at me at few times when I opened the hutch.
So, in order to retain my beauty I refused to go near the bird.
Sweet Husband was nice enough to fetch him for me this morning
so that I could butcher.. thanks Sweet Husband.
but don't tell him his face ended up in the shot. sssshhhhhhhhh

And I am pretty sure that when I went to the school to pick up the boy I was the only mommy there who noticed a fleck of chicken blood in the cuticle of her nail. Out, Out damn spot.

Tuesday, February 24, 2009

A question to the people..

Does anyone want to see an expo
on chicken butchering the Hennery way?
It is not text book, but it gets the job done.

This is FatBoy.

He is a Langshan/Barred Rock cross

and the basis of my meat bird flock.

He must go.

Let me know if ya'll want to

have pics and commentary

of the dirty deed.

It will probably be this coming weekend.

I will do it regardless, but blog coverage is optional.

Monday, February 23, 2009

A Noble Breed..

I raise Black Langshans
among other things, but the Langshans are my favorites.
Large, huge, gigantic and as gentle as a spring breeze.

And they are beautiful.
Slick black with iridescent blues, greens
and purples in the sun.
Their legs are heavily feathered.
Pictured here and most often is my Flock Sire, 'Saddleback'.
He is not a 'good' Langshan as he has iridescent gold on his
collar and along his saddle, but I find the golden feathers
to be striking and beautiful.
His sons carry the trait as well
though sometimes they carry a gold so light as to
be almost silver.

The roos are tall and deep chested and calm.

They are true gentlemen. There will be no scrapping

or posturing in the barn or in the field.

A Langshan roo is more apt to walk away and forage

in a quiet place.

Saddleback can be counted on to run the barn as well

as a good farm dog. He willingly returns his ladies into his pen

to allow another group to be let out into the yard.

He fiercely protects setting hens from the curiousity of

the other birds by standing guard outside the brooder

stall and running all chickens back down to where they

are supposed to be.

He is my right hand bird and I adore him.

He takes supreme care of his hens,

saving all treats just for them and eating only after

they have had their fill. He even tries to ply

my affections by offering me bits of bugs

and the sweetest bits of greens with his beak.

He is the only bird I have that I will bend over face to face with.

I have never had a moment of concern that I would get

spurred in the face. Instead, he will run my hair gently

through his beak while sweet talking into my ear.

This is good because his spurs are several inches long,

curved like sabers and razor sharp.


The hens are plump and round and ultimately feminine.

They are good layers of light brown eggs.

A bit more standoffish than the roos perhaps,

but a pleasure to see in the yard.

I would recommend the Black Langshan to anyone

with an interest in a beautiful and noble breed that is hearty

and reliable providing a steady supply of good sized eggs and tender, sweet meat.

They have also been known to stop traffic when they are out

where they can be seen.

However, patience is needed as the roos are very slow to mature

with many gangly and unattractive months before the

full size is achieved. I have found that it takes a year, maybe a bit longer,

before the roos have filled out completely.

But once maturity is reached.. WOW what a bird!

Wednesday, February 18, 2009

Oh Joy...

I just want to roll around nekkid
in them.. all of my beautiful seed packets.
Oh joy.
I do spread them on the table and run them
through my fingers though.
And no matter how complete my list,
without fail I notice something in the
online catalog when I order, add it in and then forget about it
so that there is a surprise in every packet!
This time it was Arumugam's Eggplant!
A lovely eggplant from India that
produces green white and lavender fruit.
Nice.

And I splurged a whole $2.50
for Clyde's planting chart.
Now, I do have a great little planting time booklet
that I printed off the computer and folded into a book
and I like it very much all tied with it's red ribbon....
but Clyde's slides! It is all nifty and it slides.
It tells me how terribly behind I am in my seed starting..
Oh cripes.
I will never catch up since you cannot gain time
and time waits for no woman and other time related quotes
that serve to remind me that spring is coming and I have so much yet to do.
And speaking of spring, there was snow mixed in with the heavy
rain that pounded my windshield early this morning.
But we have the woodstove chugging and are warm and snug.


And speaking of snug...
Here is Old Blue Sue on her throne of barn gear.
She has a soft and comfy bed all freshly laundered and fluffy,
but she chooses to pull down smelly jackets onto reaking shoes
to sprawl for a daily nap.
Dogs.


Oh, and I have eggs hatching today. 3 so far.
Oh joy

Monday, February 16, 2009

The sprunging of Spring..

Even though it is the middle of February
spring has sprung here in the
foothills of the mountains.
Both inside and out.


My lettuce is growing, but that is no feat
what with lights and warmth,
but outside things are just
as enthusiastic to get going.
The honeybees are buzzing my winter honeysuckle.
And if you do not have winter honeysuckle in your yard...
go get some!! Now!!
There is no sweeter scent in the world
and to have it in the winter months
makes it all the more decadent.
And have no worries,
it is no vine, but a polite and well behaved shrub.

And the quince is coming right along.
Within a week my bush should be covered
in bright, lively blooms.


And the weeds are in full bloom as well.
I love the light purple haze that covers my whole yard
that False Nettle gives.
And I am not sure what the delicate little blue flower is
but I love it too.
And even the tree frogs are peeping at night!
Oh, I wish you could all smell and hear my yard
these days.
Though I know it is only February and there is
plenty of cold weather to come, I cannot help
but get itchy to hit the garden..
HARD!
But, it is still winter and if spring is really here..
it is the End of the World!


And my Great Grandfather's Bee Balm
is starting to rise! A true harbinger of spring.
When the sun hits this patch of green,
even in it's young stage, the whole yard
is infused with the heady, lemony, musky
scent of bee balm!


I love this bee blam and have never seen any like it.
It blooms a bright deep red and the top one
third of the stalk and stem turns so dark purple
that it almost looks black.
Just lovely!!
Perhaps a give-a-way is in order for my
wonderful followers!!
Hmmm.
Happy Spring To All..

Anna from The Walden Effect blog has informed
me that the spry little blue flower is Speedwell!
Thanks, Anna

Wednesday, February 11, 2009

Way off topic...Decoration Day

Most of you are familiar with Memorial Day
and the placing of flowers on the graves
of fallen soldiers, but the tradition started
long before and far away.
In America, Decoration Day can be traced
to the mountains of Western North Carolina
and Virginia and the ceremony was taken
by the government after the Civil War and the date changed in 1971.

In Western North Carolina the tradition of Decoration Day
is still going strong. In the late spring families
and communities meet at the burying ground to
clean the graves and place flowers at the graves...
lots and lots of flowers. The graveyards look like this all year
round and I find them to be beautiful.


I am the keeper of all of the old, old family

pictures and have many photos taken on Decoration Day.

The family all lined up against a hill every year and had their photo taken.

I can see year by year how the children that would be my Great Grandparents

and Grandparents and my Great Aunts grew from childhood.

They would bring baskets of food and socialize all the day

and a good time was had by all.

It was the precursor to a family reunion, I believe.

I plan to attend the Decoration Day ceremonies at

Sawmill Hill this year and to bring my son. He is fascinated

by the family burying ground and the generations he can see

listed before him on the tombstones

and I think he would find the laying of the flowers

to be 'awesome!' I think I should reconnect with

the traditions that my family held dear for

so many hundreds of years too. I find myself too

far removed from my family and the rich history

of the struggles of the first settlers

in these rugged mountains.

It would do my soul good.


And no stone is left untended.

Even the ones that are so ancient as to be but

simple creekstone markers to show that a life was lived.

How long ago did this person laugh
and plant and harvest?
How many snows and springs went by?
Whom did they love?

Yep. I am going to Decoration Day this year
and a good time will be had by all.

Saturday, February 7, 2009

Down the slippery slope..

And now I am at the bid and call of
little green life.
'water me, I am thirsty'
'my roots are tight'
I'm hungry'
'My feet are wet'
'I wanna go outside'
'It's cold. I wanna come back in'
I love seed starting, but I miss
my life.

Seed List 2009:

Tomatoes:
-Wes
-Cow's Tit
-Paquebot Roma
-Amana Orange
-Abraham Lincoln
-Black Cherry
-White Queen
-Paul Robeson
-Cherokee Purple
-Peacevine Cherry

Cucumbers:
-Lemon
-Emp. Alexandre

Carrots:
-Parisienne
-Chantenay red
-Amarillo

Eggplants:
-Rose Bianca
-Ping Tung
-Early Long Black

Leeks:
-Musselburgh

Melons:
-Anne Arundel
-Chartenais

Okra:
-Emerald
-Fife Creek Cowhorn

Parsnips:
-Half Long Guernsey
-Hollow Crown

Peppers:
-Jimmy Nardello
-Frank's
-Quadrato D'Asti Russo
-Quadrato D'asti Giallo
-Fish
-Jalapeno

Radishes:
-Purple Plum
-Pink Beauty
-French Breakfast
-Helois
-White Hailstone

Squashes: summer
-Z. Rampicante
-Patisson Panache Blanc et Vert Scallop
-Crookneck Early Golden
-Costato Romanesco

Squashes: winter
-Kuri
-Butternut
-Candy Roaster - Old school family handmedowns

Gourds:
-Bushel
-Birdhouse - Old school family handmedowns

Fennel:
-Di Fierenze

Greens:
-Tatsoi
-several different mixes of lettuces
-Lucullus Swiss Chard
-Spinaches
-Red Purslane
-Rainbow Lights Chard

Brocoli:
-Green Comet
-and I can't remember

Beans:
-Pencil Pod Wax (bush)
-Dragon's Tongue (bush)
-Purple Queen (bush)

-Greasy Grit (pole)
-Jimenez (pole)
-White Willow Leaf (lima)
-Turkey Craw (shelly)

Peas:
-Early Alaska

I know that there are many more,
but I haven't gone through the
seed stores yet. sigh
I will update as time goes on.


I did start today though. It was a
gorgeous day.. warm and sunny
and I spent the day standing over the
chest freezer making plantings.

I started brocoli and chard and some lettuces.

The laundry room is lined with shelves.
Sweet Husband placed lights above each shelf
and it is a wonderful place to do seedlings.
The mounted lights heat the shelf above.

And I use the clamshells from the
salad bar at the grocer's. They make
little greenhouses during the beginning
and then when I open them, I can stack
the base of one into the lid of another.
I can also see whether the soil is dry
or whether the roots are getting
tight because the shells are clear
and I can see all that goes on in the soil.

And when the little darlings outgrow
the clamshells I prick them out
either straight into the garden
or into cups to grow more.

To prevent damp-off
I water only with chamomile tea.
It works wonders!! I never, ever have
mold or mildew or health problems
with my starts.
And when they get their second
set of little leaves I add
a hint of compost tea into my spray bottle.

And so it begins!
May we all have a bountiful harvest
and a full larder come the chill of winter next!
Hoorah!
Oh!! I forgot something!
Celeriac. You know, that ugly root from
a few posts ago. I need to start those today!
I plant Monarch Celeriac!

Tuesday, February 3, 2009

Winter Skies

Doesn't the sky look ominus?
There is a front blowing in
and I have seen actual snowflakes!
I could almost count them,
but it snow is snow and I
shall not quibble over the amount.
I am hoping for a wee bit more snow
through the dark of night.
And if I were in the mountains.....
I miss snow.
I miss the quiet sound of snow on the pines.
I miss the heavy stillness of the woods.
I miss the deep feeling of aloneness
that comes with a walk through the empty forest.
I miss the patterns and swirls of the creek
flowing onward under a skin of ice.
Oh bother.
We aren't to get any anyway.


I caught a rare pic of the tree dwelling panther
that lives with us. Bishop spends almost
as much time aloft as he does curled
deep into the feather mattress of my bed.


And behind this door
I have kits.
Sweet Husband spied them out in the yard this morning
and gave a great groan bemoaning the fact that now
we have two free ranging rabbits and their offspring
and a garden coming.
I had to go investigate.
The silly little things led me right to this door.
Sweet Husband built the rabbit door for my
first meat rabbits. There was a lovely pen
as well, but when the two buns dug out
we dismantled this communal rabbit colony
and moved them to escape-proof digs.
Then Mr White escaped and then broke his favorite
doe out as well. Prison Break 07.
I have enjoyed them in the yard
and they have grown fat and sassy on chicken feed.
But when it came time for Mrs. White
(who is a broken chinchilla color)
to make her burrow, Mr White led
her back to his old home and she dug
a wonderful burrow in the hardpack dirt
of the old smokehouse.
To save my garden and to corral
my footed feasts all we have to do
is reinstate the old pen. Fantastic!
The kits are just lovely too.


And in preparation for the next wave
of bitter cold and gale force winds
I ahve hung a second heat lamp over the
chicks in the potting shed.
There should be plenty of heat and plenty of space for all.
Cross your fingers that at least we get enough
snow to cancel school tomorrow. I would
love to sleep in and spend the day curled on
the couch firming up my seed order.

Sunday, February 1, 2009

My theory and practice of brooding...

If you ask 10 folks about brooding chicks
you will get as many answers.
Everyone has their own way
and their own theory on how to go about it.
Not that anyone asked me, but here is my way.
Of course, my preferred method is
to use a good broody hen.
Nothing mothers better and the chicks that are broody
raised are healthier, heartier and fare better
all through their lives.
Start with a chick.
Well, you should start with many chicks
as they are communal, flocking critters.
They rely on each other for warmth and comfort
and they share knowledge as well..
like where the water is and where the food is
and what is good to eat.

You can either get them already hatched
via a good hatchery or through your feed store in season.
I start all of my chicks with boiled egg
mashed into little giblets.
When you first get them and place them in the brooder
grasp them individually and dip their beaks into the water
to show them how to drink and where the water is.
I place a splash of apple cider vinegar into their water as well.
The vinegar changes the PH in their systems
making it an unpleasant environment for the bad stomach bugs
that chicks are prone to. It wards off 'pasty butt' which is
chick diarrhea. The runny poop hardens to a crust on their rears.
That is not good and must be removed gently by hand.
This is not fun for you or the chick.
The best method is to once again grasp the chick,
this time with it facing the other way.
Drip hydrogen peroxide onto the 'paste'
and wait a few moments. Then begin loosening it
gently with a tissue or washcloth. Repeat.
Do not pull!! You can pull out the innards
and this is also bad.
But if you use the vinegar trick you should
never have to experience this particular joy.


Where to keep your feathered friends...
I am fortunate enough to have the potting
shed at my disposal and no longer have to
keep chicks in my house. At least not for very long.
I wait until they are eating and drinking well and then boot
them out the door.
They have a heat lamp for warmth and they do fine.


My brooder material of choice:
PINE STRAW!!!!!
I will never use pine shavings again.
Once I stumbled on the joys of simple
pine needles I realized I will never go back.
Pine straw is inedible so you do not have
to worry about the chicks eating it
and getting impacted.
It is very warm and they make
a nest under the brooder lamp.
The poop dries and falls through! No more
smelly brooders! Ever! You can lift the pine needles
up and sweep the dried poop away and lay the needles
back down again. They last forever.
If you take nothing else away from anything
I have ever said or may say in the future,
take this bit of advice. It is life altering.


After the chicks are eating well on the cannabilistic

diet of boiled eggs I switch to chick starter.

I choose a non medicated starter as I try to raise my birds as

naturally as I can. I prefer the Layena brand from Purina

as it has no animal by products in it.

I believe in feeding my birds meat and encourage

them to eat as many yummy bugs and mice as they

can choke down, but I don't go for the by products.

I try to keep the trough feeder filled

as young birds are voracious eaters.

I keep them on starter for a couple of months

and then swith to FlockRaiser which a good high protein feed

for growing them out.

At 16 weeks of age I start the pullets on Layena laying pellets

in preparation for the onset of egglaying and the culmination of

all the months of work.

The roos... I eat.


When my chicks are 2 to 3 weeks old or so
I start adding toys into the brooder.
The first to go in is a large root ball.
I added one today.
The birds love to peck at the dirt and will eat the entire ball,
roots, dirt and all. I also add sand into the brooder house
and start giving them tender weeds.
Chickweed is a favorite and I am fortunate
enough to have tons of it.
Baby lamb's quarter is another
favorite, but whatever you have handy is fine.
Go easy on it and let their bodies adjust.

I also add a branch with many limbs.
They practice perching to gain balance
and muscle strength.
And soon they will be sleeping perched atop it.
King of The branch is also a fun game
and helps define pecking order.
They also will begin napping under it
in practice of flock safety.
'If you are under brush the hawks cannot eat you.'

Around this time I also add a dust box.
Yes, they eat that dirt too,
but they do bathe in it.
Dust bathing is the height of poultry
social structure. Think of it like a trip
to the beauty parlor
for little old ladies.
It is also good pratice for keeping
parasite free.

And that is my theory of brooding chicks.

The End.

If you can think of anything I missed
or if you have questions and/or thoughts,
please let me know.


I thought I would give an update...

They start too cute for words...

and enter the stage where they are so ugly it hurts to look at them.

yep.. it is the same bird.


And this is what a normal, healthy, well brooded
3 week old chick should look like.
Feathered, bright eyed, confident and inquisitive.